
The residency was very interesting and opened a wide angle of possibility on hardware design for live performances.
In Formello was present 9 people:
- Mauro Ferrario (IT)
- Riccardo Cavazza (IT)
- Mario Guida (IT)
- Tim Vis (DE)
- CtrlAltLab (IT)
- Thomas Sanchez (MEX)
- Gianluca Del Gobbo (IT)
- Bruce Lane (FR)
- Nikky (IT)
Hardware used:
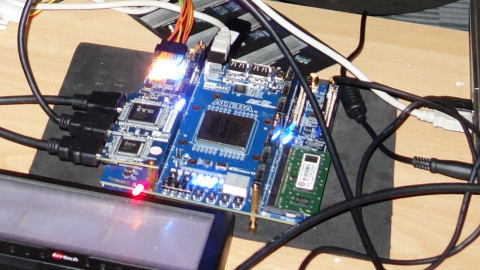
- Altera Stratix III DE3 260
http://www.terasic.com.tw/cgi-bin/page/archive.pl?Language=English&CategoryNo=39&No=260 - 4 x HDMI/HTSC daughter board
http://www.terasic.com.tw/cgi-bin/page/archive.pl?Language=English&CategoryNo=68&No=628 - Quartus software suite (quartus, nios2ide)
- Libraries for accessing HDMI cards, taken from the demo
- Demo coming from the HDMI cards
What we understood of the FPGA
FPGA cards are I/O cards, like Arduino, which have a micro-processor and a chipset to access hardware resources.
These circuits, processor and chipset are totally modular and programmable via software.
Modular, because you can create a complete chipset from physical parts, soldered virtually (see http://www.embeddedblog.it/wiki/doku.php/introduzione:manuale_vhdl ).
Programmable, because you can configure the individual properties of the components of the board via software. For the processor, you can write the microcode that will define the behavior (firmware).
To realize a FPGA-based project, two parts are needed, which have mutual implications but completely unrelated:
HARDWARE DESIGN
—- theory
You have to design the circuitry of the board, the architecture of the processor and the chipset, by providing all necessary components and interconnect them together in a functional manner.
Interconnect means it’s at an electrical level, like defining voltage, paths, etc.
Functional means allowing measurements at the physical level: power consumpsion, temperature sensors using various simulators. It is not FPS.
—- practice
Quartus software is provided with our FPGA board, which is a suite containing all the development tools for Stratix.
The Quartus tools allow the hardware design.
They compile the VHDL code to configure the board.
The design can be produced by other tools, like QSYS and SOPC builder, which has to be compiled with Quartus to create a SOF file.
This SOF file is then loaded on the board via quartus_pgm.exe, creating the desired circuitry.
FIRMWARE DEVELOPMENT
—- Theory
After configuring the circuitry and the processor, we need to write a “firmware” (for what I understand, if it is really the case) for the microprocessor, Nios in our case (http://en.wikipedia.org/wiki/Nios_II).
Basically, the firmware has to handle all the requests for I/O ports, and it can manage the processes. There is also a complete operating system available ( http://en.wikipedia.org/wiki/%CE%9CCLinux , http://en.wikipedia.org/wiki/FreeRTOS ).
—- Practice
Along with Quartus software suite, comes Nios2ide, a customized Eclipse from Altera, which allows Nios2 development.
You can write in C and C++ language, compiled with the GNU suite and gcc. You can upload the compiled “firmware” to the board directly from Eclipse.
SETUP THE DEVELOPMENT ENVIRONMENT
We have tried with 2 different versions of the software, on 2 different operating systems:
– Quartus Suite 9.1 (cd) win / linux
– Quartus Suite 13.0 (web) win / linux
Difficult to find out which is better, but I got the feeling that version 9.1 is more stable and user-friendly.
My experience was with 9.1 on Linux, on which all steps worked, apart uploading the hardware design, this document shall be updated if other configurations work.
Here are the instructions to get to the final state of the first residency in Formello :
- Install the software suite from Altera’s DVD
- Download the file in your working folder ( where you decide… ) which includes the Eclipse workspace, the hardware design compiled from the demo and the .sopcinfo and .ptf files needed for Eclipse.
In my case (not on Windows), Eclipse needs two environment variables to run
export QUARTUS_ROOTDIR = / opt/altera9.1/quartus
export SOPC_KIT_NIOS2 = / opt/altera9.1/nios2eds
on other linux or windows change the paths with the correct ones, where the software was installed - Go to the dir $SOPC_KIT_NIOS2/bin/eclipse
- Run ./nios2-ide
- Select from the Eclipse menu “switch workspace” and select the folder where you have downloaded the workspace for Eclipse.
- You may find yourself with the project “demo_remix” on the left
- Select it with the right mouse button and select “Build Project” to verify that the compilation is done successfully, with ‘a little’ warning, but the important is to get to:
“Linking demo_remix.elf …
Info: (demo_remix.elf) 102 KBytes program size (code + initialized data).
Info: 25 KBytes free for stack + heap.
Post-processing to create onchip_mem.hex
……………………………………..
……………………………………..
……………………………………..
Build completed in 1.743 seconds “ - At this point you should have the latest version from our development environment
- To run it on the board, it is necessary to load the .SOF file on the board BEFORE loading the hardware design. Then load the .ELF file generated by Eclipse with the software for the Nios.
- To load the .SOF file, you need to run the following command, in a script, a .BAT or .CMD or an alias. Write it to a txt file or memorize if you want to… X)
$QUARTUS_ROOTDIRbinquartus_pgm.exe -z -m JTAG -c USB-Blaster[USB-0] -o “p;DE3_HDMI_TX_RX.sof”
Be sure to run it inside the folder containing the .SOF file - To upload the ELF to the board we can use Eclipse at the end of compilation, just select from the menu “Run”, select “Run AS..” And “Nios2 Hardware”
- If everything went well, the board will have the hardware configured and the program loaded, connect the 2 HDMI ports ( in and out ) and switch between the two channels with keys 0 and 1
- For now, if we don’t change the hardware design and change the .SOF file, you can upload ONLY the .ELF file.
NOTES
- A small tutorial is integrated in Eclipse to show how to create a new project, to use as a reference. In general, it’s convenient to copy the “demo_remix” project at the latest version to get started.
- It’s possible to upload files from the hardware design done in QSYS in Quartus, to study and to analyze. Mariolino has done it, contact him for more information.
Video with Carlo Infante & Gianluca del Gobbo
from LPM Live Performers Meeting on Vimeo.